Technoline WT 590 Datasheet
Browse online or download Datasheet for Alarm clocks Technoline WT 590. Technoline Radio Controlled Alarm Clock with Projection User Manual
- Page / 14
- Table of contents
- BOOKMARKS
Summary of Contents
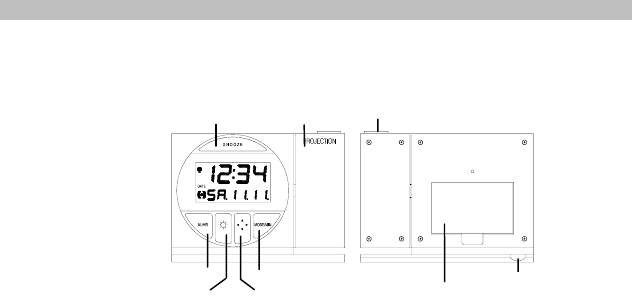
RADIO CONTROLLED PROJECTION CLOCK WITH DIGITAL THERMOMETER Instructions manual INTRODUCTION: Projector lensCongratulations on purchasing this Project
DCF-77 Tower icon Time Date display Indoor temperature display in degree Celsius Seconds display Alarm time display 24
MANUAL TIME SETTING: Hours Setting (flashing) Minutes Setting (flashing) In some cases after inserting the batteries, the Projection clock may no
1. The year digits start flashing. Use the MODE/MIN key to set the year (the range runs from 2000 to 2029). 2. Press the SNOOZE key again to enter
BACK-LIGHT: The LED back-light is automatically switched ON when any keys are pressed. The back-light will be switched on for approximately 2 seconds
MAINTENANCE: • Avoid placing the alarm clock in areas prone to vibration and shock as this may damage and inaccurate readings. • Avoid exposure to s
• Time projection (hour and minute) • Projection with adjustable brightness and projection orientation possible • Calendar display (weekday, date,
3. When the batteries are inserted, all the segments of the LCD will light up briefly and a “beep” will sound. The Projection clock will now start re
1. Connect the power adapter to a wall socket 2. Insert the adapter into the jack at the bottom of the clock 3. The Projection clock will now star
BATTERIES POWERED WITH THE USE OF AC/DC ADAPTER If the Projection clock is first powered by batteries and the power adapter is subsequently used for e
: Toggle between indoor temperature, seconds, alarm time, and date display : Enter time zone setting mode : Set the minutes, weekday and mon
Note: The projector will only project the current time. It will not project the seconds, date or temperature information. RADIO CONTROLLED TIME: The
towards the general direction of the Frankfurt/Main transmitter (avoid positioning within close proximity of metal frames or structures). Note: Use
3. Once the alarm time is set, press the SNOOZE key to confirm and exit or wait approximately 8 seconds for automatic timeout. TO ACTIVATE / DEACTIV
Related products and manuals for Alarm clocks Technoline WT 590


 (2 pages)
 (2 pages)
(4 pages)
(2 pages)
(4 pages)
 (1 pages)
  (1 pages)
(2 pages)
(2 pages)
(1 pages)
(2 pages)
(2 pages)
© 2020, manymanuals.com. All rights reserved. | 0.834 s |
 Manymanuals.com
 Manymanuals.de
 Manymanuals.fr
 Manymanuals.it
 Manymanuals.pl
 Manymanuals.cz
 Manymanuals.es
 Manymanuals-pt.com
Comments to this Manuals